|
|
Post by alkalijones on Dec 12, 2008 17:28:42 GMT -5
Hey All, Long time lurker, relatively new poster. I thought since there were lists of jacket details (agent5, Holt's list, etc.), I'd like to see a list of Indy pants details. I make costumes with some regularity and know these kinds of lists are really helpful to beginners searching for or making their own stuff. I also know lists like these drive costumers crazy because they can be quite "nit picky". On the whole though, I think they are worth while. I will be borrowing other peoples pictures quite heavily, so if I post a picture that's yours, and you don't like it, say so, I'll pull it. For me, the details are all around the waist. The first thing I notice is the lack of a waist band.  All seams and pleats go right to the top of the pants, like (at least) American BDUs. The Illusion of a waist band is created by top stitching (like BDUs). This line of top stitching also secures an internal waist band (facing) on the inside.  That band (facing) is the white fabric. While we're here, notice the five fly buttons, a slider hook and eye, and a waist band button. You can also see white suspender buttons if you look closely. Next on our tour around the waist, there seven belt loops. These are about a half inch wide and have no top stitching. Their locations are: one on the back center seam, one on each side seam, one over each back pocket, and one on top of each "major" front pleat. These belt loops are about one half inch down from the top of the waist and have their stitching securing them to the pants on the inside of the loops, not on the outside. 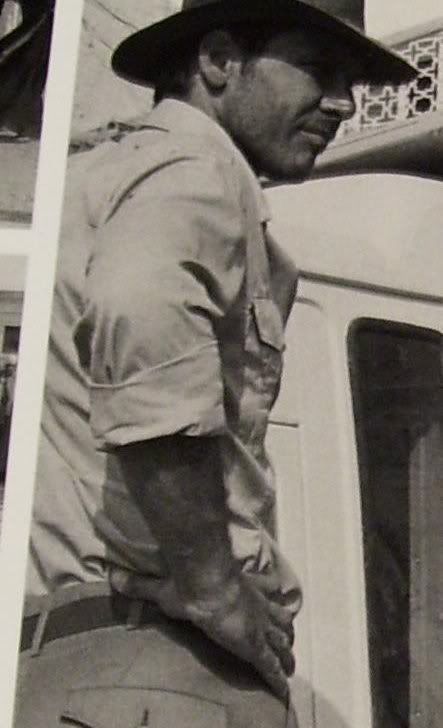 |
|
|
|
Post by alkalijones on Dec 12, 2008 18:33:55 GMT -5
Next, the pleats. There are four pleats on the front of Indy's pants. Two on each side. I'm going to call the one closest to the fly placket the "major" pleat and the one closest to the pocket the "minor" pleat.  Pants are designed so that the fly placket edge that opens is centered in the front of the pants. The "major" pleat is nearly centered between the side seam and the fly placket. The "minor" pleat is about centered between the "major" pleat and the side seam. The depth of the "major" pleat, that is, how deep the fold of fabric is, is about one inch. The depth of the "minor" pleat is about one half inch. These proportions are visible through the fabric in the "waist band" area. Move from the "minor" pleat toward the side seam about one half inch and you've arrived at the pocket. |
|
|
|
Post by alkalijones on Dec 13, 2008 7:42:13 GMT -5
Pockets. The front pockets are straight, or nearly so. They have top stitching along the front edge about a quarter inch in. The back pockets are spaced about the same distance back from the side seam as the front pocket are forward from the side seam. They are covered by flaps. The back pocket flaps also have top stitching in about a quarter inch along the edge of the flap. Here is a drawing of the back pocket flap based directly from these screen used pants. (I didn't draw it.) The dimension is pretty accurate for HF's size.  Notice that the flaps are mounted inside the pocket. (See the top picture.) Both the front and rear pocket details are very similar to BDUs. Above the pocket is a seam, it is used for shaping the pants to the (hopefully) tapering part of the trunk of your body. Most pants today have vertical seams in this area. Indy's sloped toward the side seam (forward) for some reason. This seam is centered over the pocket in the area below the "waistband". That is, it starts at a point of one end of the pocket, and ends over the opposite point at the "waistband". This seam, of course, runs on to the top of the pants, but can be ignored visually because the belt covers all the seams in the "waistband". |
|
|
|
Post by alkalijones on Dec 13, 2008 21:35:23 GMT -5
One more word about pockets. The pockets are lined in brown fabric and are constructed pretty much like... BDUs. And the back pockets have the same buttons as the fly and waist band button. These appear to be khaki colored buttons, about one half inch in diameter. Also, a word about sizes. Since the web belt is one and one quarter inches wide, (actually one and five sixteenths, I checked all five of mine) we can compare that width to other widths (and heights) and make good approximations of the real dimensions (in HF's size). For example, the web belt is one and one quarter inches wide, we can infer that the "waist band" is one and three quarters inches wide. The belt loops then are one half inch wide, and one and three quarters inches tall. Also, they are positioned about one half inch down from the top edge. The top stitching on the fly placket is about one and three quarters inches over from the edge. Top stitching. Top stitching is only used on the "waist band", the fly placket, and the pockets. No other place on the pants has top stitching.  You can see that the seam inside the pants is a plain seam. The edges are serged and ironed open (flat). there is no top stitching on any leg seam. That pretty much sums up the upper area of the pants. A word about fit though, the upper part of the pants should fit closely from about the hip line up. From there down the pants fit loosely, like BDUs do. From the hip line down, the pants taper evenly to about a nine inch military hem opening.  |
|
|
|
Post by alkalijones on Dec 15, 2008 16:09:24 GMT -5
Hey Indygear, Thanks, I'm working on it! But for now, the military hem. I've seen more posts not getting this than almost any other topic. Of course, the military hem is just hemming the back of the pants one inch or so lower than the front. Here goes: 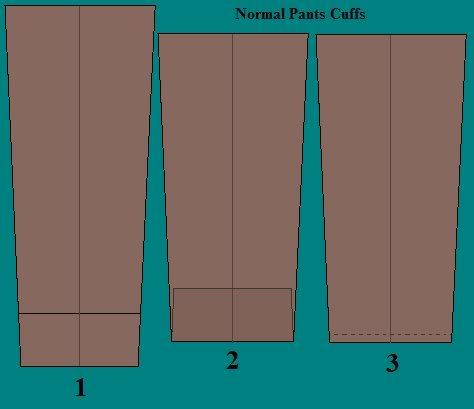 On the normal cuff, you put on the right shoes, mark the spot, tuck them in, iron, serge or false hem, and sew (blind hem stitch), like illustrated. You can't do this with the military hem: 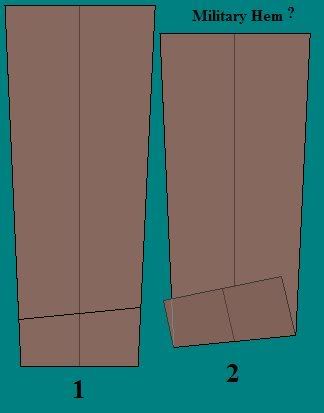 Several problems crop up. Problem one, you can't tuck the hem fabric in, it won't fit. Number two, even if you could tuck the hem in, you can't sew it without puckering the pants leg. it's just too far away. Now if you're a really tall fellow, you must do this, but, you're going to have only about one inch of hem. You're going to slit the front and back of the hem fabric (stay about one eighth to three sixteenths inch back from the edge of the finished hem, it'll stretch a little and look OK). In the front the hem is going to open up a little and in the back it's going to overlap some. |
|
|
|
Post by Kt. Templar on Dec 15, 2008 16:37:52 GMT -5
Dan,
I don't know if this helps but on the pants I examined the turned up section is a separate piece that is stitched all the way around the hem and then turned up. When it was cut off it may have been turned round or doctored in some way. I don't know I don't sew!
|
|
|
|
Post by alkalijones on Dec 15, 2008 16:42:45 GMT -5
Hey Kt. Templar, You are exactly right! Read on. OK, you ask, so how do you do the military hem? 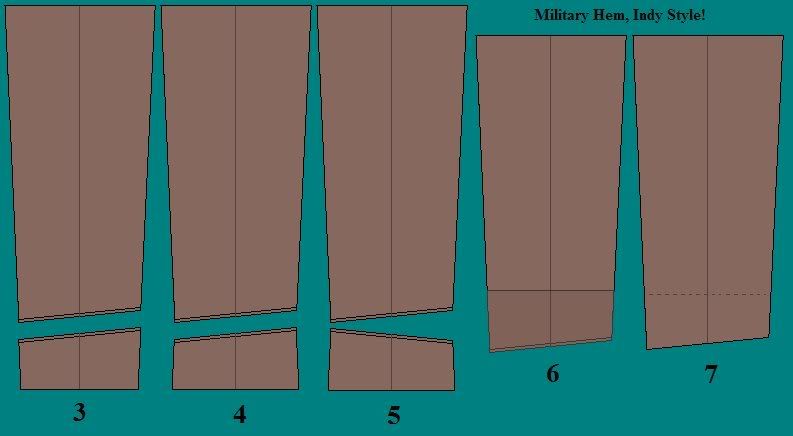 You start by marking the hem like any other (wearing the right shoes). Using pins or tailor's chalk (or any non permanent chalk), mark the military hem from front to back (illustration 1). Add seam allowance (about one half or five eighths inch will do), mark and cut off the extra hem fabric (illustration 3). Next, if you want the four inch high blind hem stitch Indy look, you must rip both side seams and re-pin and sew with the correct taper. It should be slightly smaller than the area of the pants where it will fit (illustration 4). You can check this by laying the hem pieces on the pants and marking the hem pieces so the pants just show on each side. Decide how you are finishing the top edge of your hem, either serging or a false hem and do this now as it will be harder later. Then, reverse the hem piece orientation (illustration 5) turn it inside out, and put good side to good side together (illustration 6) and sew. The hem piece will be outside the pants. The side seams should line up pretty close. After you sew, iron things the way they go (see the inside out cuff photo higher up) and hand stitch the blind hem, or, to be really screen accurate, use a machine blind hem stitch (illustration 7). This might be the time to either iron out some of the original creases if the pants are bought, or put in a little crease if you make your own |
|
|
|
Post by alkalijones on Dec 20, 2008 15:45:48 GMT -5
Hey Indygr, I've thought about a table of sizes, and I agree we need it, but I can't do it. Using a computer to measure pants that are 4,000 miles away just won't work. All my measurements are, unfortunately, couched in terms of "about", "around", etc. because I can only be close. Even if I could be accurate, I'd only be accurate for HF's size 34s (?). That's why I used proportions. For example, Kt. Templar mentioned the screen used pant had a hem opening of about nine inches. This should be thought of as a ratio. Whatever size shoe HF wore was covered a certain amount by his nine inch hem opening. If your feet are much bigger than his, you'll need a larger leg opening to achieve the same look (or smaller for smaller feet). A last few notes. I just noticed that I didn't give the proportion for the seam above the back pocket. It's .65 to .35, that is: about one third to two thirds. Here is a schematic of sorts: 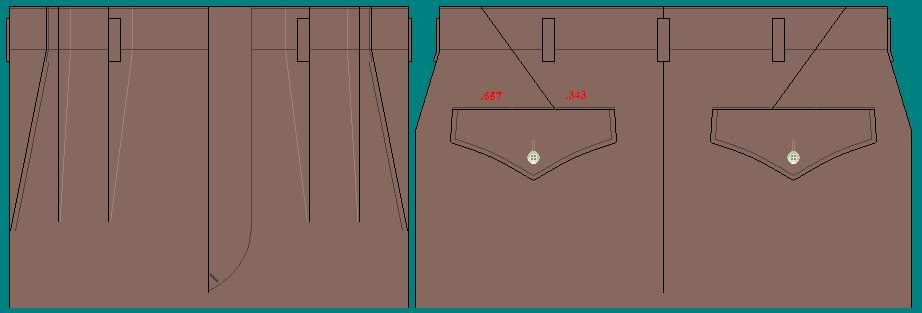 My approximation for the depth of the front pocket is around seven inches. This is a little too large to agree with Craig's drawing above. The width of the back pocket seems to be about eighty five to ninety percent of the height of the front pocket (not including the "waist band"). Probably the front pocket is not so tall. The pleats are not quite as long as the front pocket even though I have illustrated them the same length. My calculation for the length of the fly placket was eleven and a quarter inches, which seems impossibly long. It shows the limits of what can be done from 4,000 miles away! Anyway, there you have it. If you are a costumer, my apologies, I know I've stepped on all of you at least a little. I'm going to try to make my own Indy Pants from an adapted Vogue pattern. If they turn out well, I'll show them to you all. I'll be using fifty-five percent polyester/ fourty-five percent wool cavalry twill (dry clean only  ) in Taupe. It has the pinkish highlights, but seems too dark. We'll see. 'Nough said. Dan S |
|
|
|
Post by Ragingblues on Dec 23, 2008 8:17:11 GMT -5
Consider it stickied....  Ken |
|
|
|
Post by alkalijones on Dec 23, 2008 12:01:24 GMT -5
Hey Indygr,
I don't really know why the hem fabric is so wide. Your reasons sound good to me. Some have also said that the speed hooks on the shoes caught on the shorter hems.
I actually used the shoe example because of your experience, it's a good illustration of why unless you're HF's body double, allowances must be made.
Dan S
|
|
|
|
Post by alkalijones on Jan 12, 2009 13:15:13 GMT -5
Hey All,
I just replaced my "schematic" above to reflect some small omissions. First, there is some construction top stitching not included above. There is a small tack at the bottom of the fly placket that I originally omitted, also there is some construction top stitching along the front pockets in the "waist band" area. Also left out was the top stitching that attaches the back pocket flaps to the pants. The right back pocket illustration is correct, the left has my drawing details left for you to see how to line up the belt loop and diagonal seam.
Something I hadn't noticed until recently, the button hole thread matches the buttons, not the fabric or the top stitching. It appears to be slightly lighter than the buttons in color. The top stitching is, of course, darker than the fabric, but so dark that it appears to match the pocket fabric rather than the pants fabric.
I have got my Vogue pattern. I'm working on a correct color to order for the pants fabric. Once that's decided I'll order some silk thread for the top stitching and construction stitching, silk thread for the button holes and buttons, and probably a silk blend for the pockets. I'm having a little trouble finding matching buttons, but I have the size worked out (22L) and should be OK for buttons very soon. I've also found a "hook and eye" slider that matches the originals OK. I'm not sure I wish to add the suspender buttons- What do you all think, suspender buttons, or no? 'Nough said.
Dan S
|
|
|
|
Post by alkalijones on Jan 12, 2009 17:57:08 GMT -5
Hey Indygr,
Suspender buttons? Suspenders are for holding up your pants (if you don't prefer or can't wear a belt). They usually consist of two or three elastic straps that fasten to your pants, go over your shoulders, and back down to the pants. Modern suspenders often have little clips to fasten the straps to your pants, but classier and older suspenders were buttoned to the inside (or sometimes to the outside) of your waist band. In the second picture from the top, you can see that Indy's pants have suspender buttons. They are white and somewhat hard to see, but they're there.
Good observation on the pleats. The area from your hips up is kind of like a squashed cone. Instead of the base of the cone being round, it's kind of oval. This cone would have it's point around your upper chest or neck were it not interrupted by your waist and upper body. All seams and pleats would lie on the line that passes through that "point". So, yes, the pleats are not parallel to the fly placket, nor technically is anything else. My "schematic" shows them parallel because that's easier to draw that way.
Thanks for the luck! Can't wait for the swatches to arrive!
Dan S
|
|
|
|
Post by alkalijones on Jan 30, 2009 16:10:06 GMT -5
Hey All, Just got some fabric swatches from New York, Greece, and England. The swatch from New York is a fabric supplier who has Cavalry Twill. I asked for a medium brown fabric that had pinkish or purplish highlights. The swatches from Greece were a small sample drop off from MBA Raiders pants, and a larger sample drop off from Wested Raiders pants (second generation). Thank you Indygr. The swatches from England were a relatively large piece from some second generation Wested Raiders pants, and a small piece of NH ToD pants (not pictured). Thank you Kt. Templar (and the lovely and talented Lady Canyon). 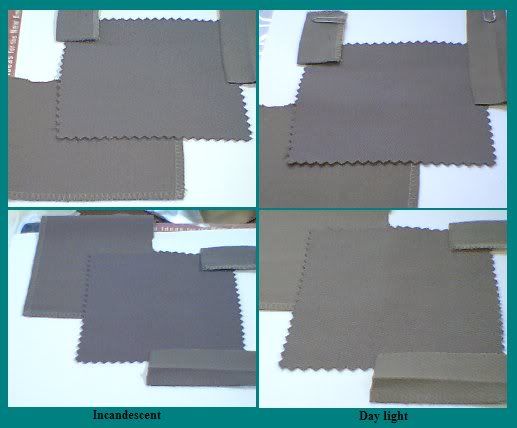 I'm afraid I'm much better at sewing than computer stuff. These files originated as a TIF file. The only thing I could figure out to do with them was to move them to a paint file. I can't color correct or anything else. I rotated the samples because my sample (the one with the pinked edges) changes so much with changes of light. The smallest sample (it has a paper clip) is the MBA sample. In real life it's rather olive looking. The largest sample is from Kt. Templar. The in-between size sample (with the crease and a paper clip) is from Indygr. I think the top left picture looks the most accurate on my monitor as far as how it really looked to me. I think the vendor sample is the color of officer pinks, and so is a little lighter, slightly greyer, and somewhat pinker. Further, it has a finer wale (smaller and closer together rows of weaving). Maybe this is why the color changes, I don't know. Anyway, I'm making progress on modifying the pattern. I should start cutting and sewing in the next week or so. I'll keep you all posted. Dan S |
|
|
|
Post by alkalijones on Feb 27, 2009 17:13:07 GMT -5
Thanks Indygr. Hey All, I changed my “schematic” again. It seems this is harder than I thought. (What Isn’t?) I started modifying the pattern at the diagonal seam above the back pocket. I got the impression that this was hard to do from others, chiefly PLATON. This was because of the trouble his tailor was giving him about doing it for his pants. Well, it turned out to be very easy to modify the pattern to have this seam at an angle. Go figure. Next, I started looking at changing the back pocket. This was way harder for me because I have never made “bound” pockets before. I think I have that licked. Now I’m working on the “waste band”. That’s where I found another line of “construction top stitching”. On the new “schematic”, it is the brown line just below the top of the waste. It’s easy to find this stitching on the inside of the pants, not so much on the outside. I’ve checked every pair of pants I own, including dress pants, and every one of them has this line of stitching, even blue jeans (and BDUs). However, no picture that I have clearly shows this line of stitching on the outside of Indy’s pants. Some pictures do seem to have something there, so I’m going with it. Does anyone have a picture to help out with this? After the “waste band”, I’ll fix the “minor” pleat location and then I’ll be able to start cutting fabric! Oh, if anyone has a lead on buttons, they’re proving hard to find. Does anyone have a line on four hole, tan 22L (lignes) buttons that look like Indy’s? I’ll post pictures when I’ve got something. Dan S |
|
Deleted
Deleted Member
Posts: 0
|
Post by Deleted on Feb 27, 2009 20:49:48 GMT -5
The swatches from England were a relatively large piece from some second generation Wested Raiders pants, and a small piece of NH ToD pants (not pictured). Thank you Kt. Templar (and the lovely and talented Lady Canyon). Oh my!  how very sweet of you.  |
|
|
|
Post by alkalijones on Mar 2, 2009 11:19:27 GMT -5
|
|
|
|
Post by alkalijones on Aug 28, 2009 13:26:40 GMT -5
Hey All, Ok, I've been whining about finding buttons. I think I found some. Check these out:  The Off-White color seems really close (I have a sample). The White button and the Taupe button are right side up, the Off-White one is upside down in the picture above. One drawback though, I have to buy a gross of buttons (one hundred and fourty four). That means I'll have a few spares, so, if any of you want some buttons to replace your Westeds or Magnolis or Paris or whoever, let me know and when I get mine, I'll share. That's all for now. When winter comes around, I'll have more time to work on this and there should be more and faster progress. In a day or so I'll post pictures of the sample button I have with the correct fabric, and you can see how it looks for yourselves. Dan S |
|
|
|
Post by alkalijones on Aug 31, 2009 11:39:11 GMT -5
Good work on finding those buttons Dan. I would say that either Olive or Taupe will go well. Also brown is good. Compare and contrast with the sample fabric you have and "choose wisely"  I would tend to use more Brown since it is a more generic colour for those type of trousers. Keep up the good work!! Indygr Hey Indygr, I must respectfully dissagree on your color choices. While the colors you mention would match and definitely look nice, they would not be accurate to the originals. Since the photos above are the actual pants wore in "Raiders", and my goal is Screen Accuracy, then the buttons (and the button hole thread) must be a tan-ish color. That is why I think the Off-White color is best. A color he sent that is not in the photo (of his website???) is called Cream. It's a little too light in color, but is shiny, like the originals. You'll see in the pictures when they happen. My daugher's digital camera needs batteries! Pictures after the next trip into town. Dan S |
|
|
|
Post by Kt. Templar on Aug 31, 2009 12:05:20 GMT -5
I'd go with the off white, or the taupe if you are being conservative. I'm in for a dozen buttons depending on price Dan.
|
|
|
|
Post by whipcracker on Oct 14, 2009 9:01:59 GMT -5
so what happened with the pants, did you finish them?
|
|
|
|
Post by alkalijones on Oct 18, 2009 11:41:30 GMT -5
Hey whipcracker,
No, they're not finished yet. I've modified the pattern some, sourced fabric, bought buttons. I'm still at it but summer is a busy time here. We have cows, bees, chickens, etc. and they get my time before costuming does. Also, we sell costumes and orders get priority over development. Come winter, we'll get these done and maybe sell "The Pants", too. We'll see how it goes.
I still need pocket fabric, then I'll order silk thread for construction, top stitching, and button holes. It's coming, just slowly.
Dan S
|
|
|
|
Post by whipcracker on Oct 18, 2009 22:29:01 GMT -5
 Sounds good! Just keep us posted. I for one am very interested to see how things turn out. What if someone put in a costume order for some pants...? 
|
|
|
|
Post by alkalijones on Oct 20, 2009 19:59:44 GMT -5
Hey whipcracker, That is my intention. If mine turn out well and I can figure out sizing, I'll offer pants to others. I'm still having trouble finding good fabric, though. Always a blended fabric, which sooner or later will pill.  Oh well. Maybe I can buy fabric from PLATON. He found great fabric. A perfect match for NH. Dan S |
|
indybyrd24
Temple Guard
 I don't know, I'll think of something
Posts: 140
|
Post by indybyrd24 on Mar 3, 2010 12:50:48 GMT -5
Any updates?
|
|
|
|
Post by alkalijones on Mar 8, 2010 13:38:40 GMT -5
Hey indybyrd24,
No, I'm waiting to see what Todd does. We are a custom house. Todd produces an "off the rack" product. (This is not a slight about quality- Todd does fine work. Simply a statment of fact.) If his Indy pants are good, well- I'll stick to my Star Wars stuff. If his pants are not good, this project will come right back out.
I mean, lets face it, if I can buy what I want (nice, accurate Indy Pants) at a good price, then there is no need to make my own. If I can't, then I'll make my own and that will (hopefully) bennefit all of us.
Dan S
|
|